23 Apr 2014
by gastrojourney
in Cuisine, Western
Tags: Beef, Gravy, Meatballs, Pork, Swedish, Western
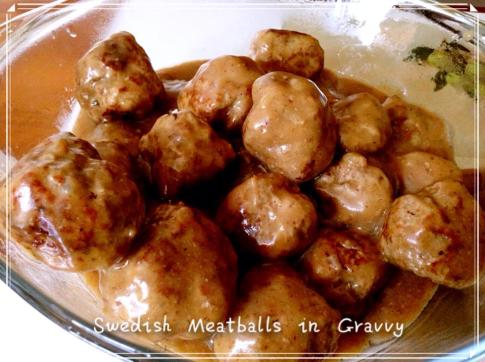
I’ve been craving for meatballs for quite awhile now. I have always missed IKEA’s meatballs, they’re just so mouth-watering. I remembered ordering meatballs whenever I went to IKEA back in those days when it was just an arm’s length away. IKEA is not available here, so I’ll have to replicate the meatballs should I wish to have them. After extensive research on the Internet, I gave this particular recipe a try and the meatballs came out super delicious. I hope all of you like it. I made them into smaller meatballs so I could use some of them to make spaghetti meatballs bolognese too. 😉
Ingredients – Meatballs:
500 gms of minced beef
400 gms of minced pork
1/2 cup of breadcrumbs
1 medium sized onion (finely chopped)
2 cloves of garlic (minced)
2 large eggs
Approx. 2/3 tsp of salt and dash of pepper
Method:
1. Mix all ingredients together at once until they’re all completely mixed.
2. Shape into meatballs.
3. Pan fry the meatballs using a non-stick pan (*NO oil) or you can bake them in the oven at 200 deg. C. (Be very careful not to burn the meatballs)
4. Set them aside for later use.
* Thanks Sherl and Teri for sharing their delicious recipe. The meatballs are awesome. Note that I’ve omitted the peccarino Romano cheese in this recipe. However, the taste has not been compromised.
Ingredients – Gravy:
1 cup of beef broth/stock
Corn flour (to thicken the sauce – depends on the consistency that you want)
2 1/4 tbps of thickened cream
Dash of pepper and chicken granules (optional)
Method:
1. Warm a non-stick pan, pour in the beef stock and corn flour and whisk the mixture until it begins to thicken.
2. Add in the thickened cream and continue to cook until it reaches the consistency.
3. **I undercooked the meatballs when I was pan-frying them, so I poured in the meatballs at this stage to let them simmer together with the sauce until the meatballs were cooked and the desired consistency of the sauce was reached.
4. Dish up and serve.
Bon appétit!
16 Apr 2014
by gastrojourney
in Uncategorized
Hooray!! I’m back!! At least, I think I am. Given that my PhD is now done and dusted, I can return to blog about my food adventures. After a year of slacking, I think I need a bit of time to get myself adjusted and have my recipes ready for entries. So, please stay tuned for a little while more and I’ll be good to go in no time. 😉
15 Apr 2013
by gastrojourney
in Uncategorized
Tags: Updates
It has been half a year since I last updated my blog and many apologies to my friends and supporters for not keeping you all updated with what’s happening with the blog. I have been really busy with thesis writing as it has FINALLY come to its last stage and I’m trying to finish up my PhD journey in the next month or so. I look forward to putting more entries to my blog very soon.
Till then, take very good care and have a wonderful day! 😉
15 Oct 2012
by gastrojourney
in Chinese, Cuisine
Tags: Chicken, Chinese, Food, Ginger, Recipe, Scallion, Stir-Fry

Mouth-watering stir-fry chicken
This is a super good dish for a cold day. The exotic ginger warms the wintry gust. This dish calls for a more than usual amount of ginger. But, it’s worth it! It is super yummy to go with a bowl of hot jasmine rice. I would go for two! 😀
Ingredients:
- 6 deboned chicken drumsticks
- 4 stalks of scallions/ spring onions
- 5 cms of ginger
- Light soy sauce
- Dark soy sauce
- Oyster sauce
- 1 tsp Chinese cooking wine – Shaoxing Wine (绍兴酒)
- A bit of sugar
- A bit of salt
- A dash of pepper
- 1/2 tsp sesame seed oil
- 1 1/2 tsp of cornflour
- 2 cloves of garlic
- A bit of oil
Cooking Method:
- Debone chicken drumsticks and cut them into bite-sized pieces.
- Marinate chicken pieces with light soy sauce, oyster sauce, dark soy sauce, a bit of sugar, pepper, salt, and cornflour for 2 hours.
- Mince garlic, cut scallions into 2cm-length pieces, and cut ginger into thin slices.
- Heat oil in a wok, add in minced garlic and stir-fry until fragrant.
- Add in scallions pieces and ginger slices, continue stir-frying until fragrant.
- Add in marinated chicken pieces and stir fry for 1 minute.
- Add in 1 tsp of sesame seed oil and 1 tsp of Chinese cooking wine. Stir fry for 1 1/2 – 2 minutes.
- Add in a bit of water and cover the wok. Let the chicken simmer for 1 – 1 1/2 minutes.
- Taste test and season it with a bit more light soy sauce and pepper (if required).
- Once the chicken is cooked, dish up and serve with hot jasmine rice.
Happy cooking! 🙂
15 Oct 2012
by gastrojourney
in Soup
Tags: ABC, Carrot, Chicken, Malaysian, Peppercorns, Potato, Recipe, Soup, Tomato

Warm and Hearty ABC Soup
It’s a cold and windy day here in Dunedin today. Therefore, I came out with the idea of boiling a pot of hot soup to keep me warm. But, what would be best in this kind of weather? After looking at the ingredients I have in stock, ABC soup came to my mind. ABC soup is a very typical Malaysian household soup. What a name to give to the soup? ABC actually stands for Vitamins A, B, and C. This soup calls for a lot of different types of vegetables, which provides different types of vitamins. Hence, the name ABC. Although my picture looks a bit unappealing, the taste of the soup is superb. The peppercorns provided just enough oomph to keep a cold day warm. Hehe…
Ingredients:
- 1 to 2 chicken frames (I used 6 chicken drumstick-bones and 1/2 chicken frame)
- 2200 ml of water
- 4 sticks of carrots
- 3 onions
- 3 potatoes
- 4 tomatoes
- A small piece of preserved vegetable “Zha Cai” – (榨菜)
- 1 – 1 1/2 tsp crushed peppercorns
- Salt – to taste
Cooking Method:
- Par-boil chicken frames and/or bones.
- Clean the par-boiled chicken frames and/or bones under running water.
- Cut carrots into bite-sized pieces.
- Quarter onions, potatoes, tomatoes, and preserved vegetable “Zha Cai”.
- Bring 2200ml of water to boil in a big pot.
- Once the water boils, add in the chicken frames and/or bones, carrots, onions, potatoes, tomatoes, preserved vegetable “Zha Cai”, and crushed peppercorns.
- Boil the soup for at least 2 hours. Make sure you check the water level from time to time and add some hot water if the water is drying out fast. (I usually boil my soup for 4 hours)
- Season the soup with salt before serving it hot with lunch and/or dinner.
Enjoy! 🙂
13 Oct 2012
by gastrojourney
in Chinese, Cuisine
Tags: Chicken, Chicken Drumsticks, Chinese, Chinese Sausage, Food, Recipe, Salted Fish, Steam

Easy Steamed Chicken with Salted Fish and Chinese Sausage
Given that I’ve been busy these days, some easy recipes would be of much help. So, what sort of recipe would fit the bill? I went through my inventories and found that I have some salted fishes lying in my box of unused ingredients with one Chinese sausage left in the fridge. Therefore, the thought of steaming my chicken drumsticks with the aforementioned two ingredients struck me. An easy-peezy recipe.
Ingredients:
- 5 drumsticks
- 1 – 2 Chinese sausage(s) (腊肠)
- 5 cm salted fish (梅香咸鱼)
- 1/2 inch julienned ginger
- 1 1/2 tsp oil
Ingredients for Marination:
- 1/2 tbsp light soy sauce
- 1/2 tbsp Chinese Shaoxing cooking wine (绍兴酒)
- A dash of pepper
- 1 tsp sesame seed oil
- 1/2 tsp sugar
- A little bit of dark soy sauce
- 1 – 1 1/2 tsp cornflour
Cooking Method:
- Cut the drumsticks into bite-sized pieces and marinate the drumsticks with the ingredients for marination for 1 to 2 hours.
- Prepare a steamer, slice Chinese sausage(s), cut salted fish into small pieces.
- Heat oil and pan fry the salted fish pieces. (Do not burn)
- Put the marinated drumsticks together with the sliced Chinese sausage(s), salted fish pieces, and julienned ginger on a stainless-steel plate or alternatively, wrap the ingredients with aluminium foil, and put it to the steamer.
- Steam the ingredients on high heat for 25 to 30 minutes. (Make sure the chicken pieces are cooked)
- Once the chicken pieces are cooked, serve hot with jasmine rice.
Happy steaming! 😉
13 Oct 2012
by gastrojourney
in Chinese, Cuisine
Tags: Bread Maker, Chinese, Dry, Egg Noodles, Flour, Food, Homemade, Noodles, Pasta, Recipe

Dry Homemade Noodles
I love noodles ever since I was a kid, especially yellow noodles and egg noodles. However, I first tasted homemade noodles about a month ago when Gloria, one of my friends, made it for our last gathering. I got so fascinated with it and I asked her for her recipe. She told me it was really simple, whereby she only used high grade flour, a bit of water and salt. Combine these ingredients and knead them into a pasta dough. The moment I heard “kneading” was involved, I took a step back. Well… well… well… I can be quite a lazy cook. Hehe… So, what has changed? Bread maker has changed the whole story. It’s a real life saver. 😉
Ingredients:
- 3 1/2 cups high grade flour
- 3 jumbo eggs
- Pinch of salt
- 1 tsp oil
- 1/3 small bowl of water
Seasoning for the Dry Noodles: (For 1 person – adjust according to personal preference)
- 1 tbsp oyster sauce
- 1 tbsp light soy sauce
- 1/2 tbsp dark soy sauce
- 1 tsp sesame seed oil
- A dash of pepper
- 1 1/2 tbsp oil
- 1 clove of garlic (minced)
*These measurements are just a rough guide. I don’t follow the measurement, I adjust the taste according to my own preference.
Method:
- Add all the ingredients to the bread maker tin and return the bread maker tin to the bread maker.
- Select “pasta dough” function.
- When the pasta dough is ready, let it rest for 20 to 30 minutes. (I did the dough about an hour earlier so I transferred my dough into an airtight container – to prevent the dough from getting dried)
- Sprinkle a bit of flour on your work bench and on the pasta dough (this is to prevent the dough from sticking).
- Use a rolling pin and roll the pasta dough into a thin sheet of approximately 4-5mm on the floured work bench.
- Dust the top of the pasta sheet with some flour and roll it.
- Use a sharp knife to cut the pasta roll into strips (depending on how broad you want your noodle to be).
- Unroll noodles and sprinkle a bit of flour to prevent the noodles from sticking to each other. Let the noodles rest for 5 minutes.
- Bring a pot of water to boil.
- Add noodles into the boiling water and cook for 4 minutes.
- Pour the noodles into a sieve to drain off the water.
- Let the noodles run under cold water for 1 minute.
- Bring the noodles and a pot of hot water to boil.
- Drain off the water.
- Noodles are ready to be used.

Cutting the handmade noodles
Cooking Method for the Dry Noodles: (For 1 person)
- Mince garlic.
- Heat a bit of oil in a wok and add minced garlic. Stir fry the minced garlic until fragrant.
- Pour a bit of oil to a clean plate.
- Add noodles (for one person) to the plate.
- Season the noodles with oyster sauce, light soy sauce, dark soy sauce, sesame seed oil, and pepper.
- Mix the noodles and seasoning well.
- Serve hot.
Bon appétit! 😉
11 Oct 2012
by gastrojourney
in Jam
Tags: Bread Maker, Breakfast, Coconut Cream, Eggs, Food, Jam, Kaya, Recipe, Spread

Super delicious Kaya
Kaya or coconut egg spread, is a spread commonly used by Malaysians and Singaporeans for our breakfast toasts. I tried making Kaya once about 1 1/2 years ago but it turned out lumpy. After which, I did not bother trying it out again given the time I needed to spend on constantly stirring the mixture during the cooking process. However, some of my friends were discussing about Kaya over the dining table the night before and the thought of making Kaya struck me again, especially now that I co-owned a bread maker. This recipe is a modified recipe from one which I fumbled upon yesterday afternoon and it calls for a bread maker.
Ingredients: (Makes 2 jars)
- 400ml coconut cream
- 400ml eggs (7 jumbo eggs)
- 170 grams of castor sugar
- 170 grams of brown sugar
- 2 sterilised jam jars (preferably glass jars)
Cooking method:
- Measure coconut cream and pour it into the bread maker tin.
- Measure eggs, castor sugar, and brown sugar.
- In a big bowl, combine the measured eggs, castor sugar, and brown sugar. Beat the mixture lightly.
- Pour the mixture into the bread maker tin.
- Return the bread maker tin into the bread maker and set to “jam” function.
- When the jam is done, bring the Kaya mixture to cool.
- Pour the Kaya mixture into a clean blender, blend the mixture for 1 to 1 1/2 minutes.
- Pour the blended Kaya into sterilised jam jars.
- Refrigerate the Kaya once it is totally cooled down.
Enjoy this sinful yet delicious spread for your breakfast toasts! 🙂
07 Oct 2012
by gastrojourney
in Cuisine, Malay
Tags: Asparagus, Dried Shrimp, Food, Kangkung, Malay, Recipe, Sambal, Spicy

Sambal Asparagus
I am back for a bit… Yay! So, what have I been doing these days? I’ve been busy writing my thesis as per what I’ve posted in my previous entry. I attended a conference in Auckland about two weeks ago and guess what… I found Kangkung (通心菜), a type of green vegetable, in Asian supermarkets in Auckland. It was such a rare sight. I bought two bunches back to Dunedin and I tried cooking Sambal Kangkung, which is a typical Malaysian vegetable dish cooked in chilli paste. Given that Kangkung is unavailable in Dunedin and asparagus is currently on sale, I replaced Kangkung with asparagus. It turned out yum!!
Ingredients:
- Asparagus/ Kangkung (Can be replaced with eggplants too)
- 1 1/2 – 2 tablespoons oil
- Sugar
- Salt
- 2 tablespoons dried shrimp (soaked)
- 3 tablespoons chilli paste (I replaced this with 3 dried chillies and 3 red birds eye chillies)
- 6 shallots
- 4 – 5 cloves of garlic
- 2 teaspoons belacan (dried shrimp paste)
Cooking method:
- Soak dried shrimps in a bowl of water for an hour. Drain off the water into another bowl and keep the liquid for later use.
- Soak dried chillies in hot water. Drain off the water.
- Remove the skins of the garlic and shallots.
- Blend the soaked dried shrimps, dried chillies, red birds eye chillies, shallots, garlic, and belacan with some dried shrimp liquid using a blender.
- Heat oil in a wok, add in the chilli paste and stir fry it until it is fragrant and its colour turns a shade darker. (Do not burn the paste)
- Add in asparagus and season it with a bit of salt and sugar. Continue stir frying for 2 minutes on high heat.
- Add in a bit of the dried shrimp liquid and cover the wok with a lid for 2 minutes.
- Check if the asparagus is cooked. Once it is done, dish up and serve hot.
Enjoy this delicious hot and spicy Sambal Asparagus! 😉
10 Sep 2012
by gastrojourney
in Uncategorized
Dear Readers,
It has been awhile since I last updated my blog and you may be wondering why. I have been busy writing my thesis to meet a deadline. I will update my blog with more recipes once I get my current chapter done. Please stay tuned for more recipes!
Till then, take very good care and I will post again soon!
Cheers! 🙂
Previous Older Entries


